Archive for Level 3

Level 3 Happy Dance

It’s official, my level 3 card arrived in the mail yesterday! And I did a lil happy dance right there in the post office lobby. You’d thought that there was money in the envelope by the grin on my face.

My rocketing goddessness is finally realized. Of course this is a self-appointed title. However I remained convinced that if I state it often enough and with enough conviction that people will start to believe it or do so just to humor me. Take a cue from my family people. Resistance is futile.

Big thanks to my TAPS Jack and Kurt, and to Greg for the hours of mentoring. The beast in now unleashed.

Rocket Scientist by Teddybears featuring Eve

It’s Official, Great Success Level 3

Quick post to share the success. It’s been in the works since November. Wind has not been my friend, however Saturday July 9th, it was not an issue. More details to follow in later post.

Thanks G for the great shots!

Level 3 Documentation

Okay this is it. All fingers and toes are crossed for good luck! Flight is targeted for January 8th at Lucerne.

Level 3 Documentation

Thanks G for always reading my blovel. I appreciate the detailed feedback.

Test Flight Documentation

“You can only grow if you’re willing to feel awkward and uncomfortable when you try something new.” – Brian Tracy

This documentation for the level 3 flight feels like the equivalent of a term paper. What  the heck was I thinking. In preparation of the real event, I conducted a test flight using my level 3 rocket with a level 2 motor. The rocket did great both attempts, the human improved after the first.

Pre-Level 3 Documentation

Homework for Level 3

Last launch I was able to get feedback from Kurt and Jack on my rocket construction and electronics design. Fortunately only a few items to be addressed and some recommendations for future designs. Part of good design is to try to anticipate anything that could go wrong.

On the electronics board, is a switch to control the on/off for the ARTS2 altimeter. I had set mine up like a light switch. Click it up to turn on. However there is a lot of force when a rocket launches and there is a chance that the switch could get pushed down. The fix is to rotate the switch 90 degrees so it is horizontal. I could also change it so up is off and down is on.

The second correction needed is to secure the altimeter bay to the payload bay with a screw. Right now that part is held in place with three plastic rivets and I have a safety net of a shock cord tethering the piece to the nose cone. So that way if rivets give way, will not lose those parts.

This week, I will implement those two modifications and get my level 3 flight plan submitted to my advisors. December 11th in Lucerne is the target date for the level 3 flight.

Redemption!!!

Last week’s blunder of the electronics at Plaster Blaster had me miffed. I stewed about it the entire two-hour drive home. Mid-week I decided that I was going to ROCStock in Lucerne Valley prove myself ready, for me. I also wanted to really test if I could do everything without a safety net. Typically fly with G, so if I get confused or flustered I can just ask him.Last weekend I think I broke his patience and he was prolly rethinking his desire to mentor fellow rocketeers his entire drive home.

So I borrowed equipment and headed out. Two goals 1) to meet with my TAPS Kurt and Jack to review my rocket and talk about preparation for level 3 certification, and 2) fly Serendipity and recover my dignity.

ROCStock was packed with lots of exciting projects launching. Was able to wrangle the TAPS and get much-needed feedback on rocket and electronics board design (which I will cover in another post). By then it was pretty late on Sunday 11:30am, as usually flying wraps up around 1pm ish. Luckily it was a nice day, clear sky and only minor bursts of wind, and range would not shut down until 2pm. So I hurried to get my prep done, which is funny cause it takes me a long time. If I get rushed then stupid mistakes happen. It all worked out and fellow rocketeer Ian helped me load the rocket on the pad. He also made sure I was good and nervous by asking me if I was sure ready to fly.

The launch was bootiful, a CTI L995 motor with red flames. Nice and straight, and ejected chute at APOGEE. I was holding my breath, cause if I mucked it up again I would just wish for the lake bed to open up and swallow me. I had the CSI Receiver ready to track my rocket. I had loaded a transmitter in the rocket as it was a bit windy and knew it would drift a bit before landing. This was my first time using the CSI unit. Was also super motivation to find rocket as I had about $700 worth of borrowed equipment in it.

This is the CSI Receiver (below):

This is the CSI Transmitter (below):
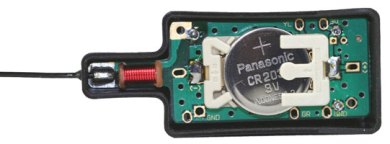
The wind carried the rocket about a mile away. We saw the general landing area, thanks to a large tree as a marker. As I wandered out with the Receiver listening to the beeps, things started to get wacky about 1/2 mile in. I lost signal and then it started to only emit a beep back towards the launch area. I knew this was not right and kept on despite the contradictory signal. Luckily the rocket was easy to spot.

The rocket looked great with no damage. Quick assessment I noticed that the CSI Transmitter and one of the nomex cloths had fallen off. As I gathered up the rocket, I saw some sort of dead animal remains. Ewwwwwwwwwwwwwwwww. Did not take long to examine it. Grabbed the rocket and began the trek back.

The rocket weighs about 25 lbs, however as I trudged across the dry lake bed and jumped over ruts it seemed much heavier. The biggest rub was the brush was itchy and got stuck in my socks. Luckily about 1/4 mile to get back, one of the fellow rocketeers (John in the red Jeep) drove out to haul my tired and very grateful person back. As we drove, I spied a bright green, and asked to stop. Much to my delight it was my tracker. Some days I am lucky. Great flight, solid recovery, all equipment (except nomex cloth) intact, and my confidence soaring.

Exactly What I Asked For But Not What I Wanted

Ok so I will own that I am a contradictory and often an inconvenient woman, however that has nothing to do with this post. This weekend was Plaster Blaster 9, and originally I wanted to go for my level 3 certification during this event. Plans changed and instead this would be the opportunity to fly the unnamed Xtreme Darkstar to demonstrate 1) solid basic construction, 2) use of electronics to control deployment, and 3) rigorously test G’s desire to be a  mentor.

This is a beauty shot of the setup. What is does not convey is the hours of launch preparation.

Get ready, it’s pressuring up. This is a gorgeous motor, CTI L820 Skidmark.

Thanks to pilot Harald Berge, for his well-timed photos of the launch. So nice to have someone else take photos, so I can stand back and just enjoy watching the flight.

Apparently these are mach diamonds. New learning for me.

Just a lovely take-off. Everything looked great until apogee. This is where my altimeter interpretation blunder comes into play. I instructed both altimeters to deploy the parachute at ‘Main’ which is low altitude instead of “Apogee’.

View of Ozark ARTS2 altimeter above

View of the Featherweight Parrotv2 altimeter above.

The rocket started to free fall, which is never a good thing. Luckily the rocket design saved itself by shifting horizontally and slowly spinning. Kinda like a helicopter blade, and then the parachute ejected. Recovery of the rocket was straight-forward, no damage. I was upset with myself, not the rocket, as it did exactly what I told it to do, but not what I wanted!

My fellow rockteers told be that I was the luckiest rocketeer that despite my mistake it turned out okay. The rocket launched unnamed, and after that fateful flight had named itself Serendipity.

Where Is My Mind

Good thing I had some extra time to work on the rocket, as I was deluded that I was almost done. As I was writing up my pre-flight prep list and discovered some d’uh items. Better to find them now then on launch morning.

I had waited to epoxy some of the last pieces…..and much to my frustration this is when I caused my own problems.

Was thinking that it was smart to include the bar on the u-bolt for reinforcement, however what I did not think through was that it would alter how these top and bottom pieces would fit on the avionics bay.

The electronics sled fit flat and snug inside the tube and against the lids, however with the u-bolt bar I had to file out space for this to fit in. Not a big deal, but it annoyed me.

When creating the electronics bay, G recommended that I make the mark the top and bottom accordingly. Well I did all that, yet did not notice the rivet holes that secure the electronics portion to the upper airframe. So I marked everything upside down.

Again not a huge deal, just made me wonder (cue The Pixies Where is My Mind?).

Argh drill the rail button screw holes too big. Yes the screw is 1/4″ and no you do not use that same size drill bit. Seems obvious now.

When the bulkhead ring was epoxied into the nose cone shoulder, it changed the shape a bit. So it was now a tight fit into the upper airframe piece. It took must sanding to correct this, and needs a bit more before Saturday.

By far, the most frustrating of all the bozo manuevers was the retainer ring. I decided to install it post build, however I made two mistakes that came back to bite me (and G) in the ass later. 1) The rear centering ring should be flush with the end of the motor tube, I managed to get mine a bit recessed and 2) when marketing and drilling the holes these were slightly turned inward (due to problem #1). I desperately needed G’s help to correct my mess on this.

Black Powder Experiment

This work for L3 project is really stretching my skillz. Since I am using electronics to control deployment of the parachute, I get to experiment with black powder, that’s gun powder people. Makes me feel like a mad scientist. With this rocket kit, it uses nylon screws to keep the nose cone in place.

As part of my design, I have to determine how much black powder is needed to properly deploy the recovery system. So I need enuff umph to break the shear pins, blast off the nose cone, and eject the parachute. I calculated some rough estimates based on the rocket diameter and tube length, however I did not know how to take into account the shear pins. G recommended a ground test.

Here’s the set-up. The rocket rests on wooden holden with lots of blankets to cushion any parts and protect G’s house from destruction. There are wires leading from the charge in the rocket, hooked up to a battery, with a continuity key/launch button. G’s done this before so has the process down, and all the right equipment to make it easy.

Here’s a video of the ground test http://www.youtube.com/watch?v=pYIZfPW9pY8

Be warned this is my first video, so excuse my lameness. The 2g of black powder was clearly not enuff. I will re-test at Plaster site with 3g.

Flight rescheduled for Nov 6th @ Plaster Blaster 2010

My original plans to launch level 3 test flight October 9th were canceled. So Plaster Blaster 2010 November 6th is my new date.

I had to travel up north to the San Francisco bay area, so I packed up my car with my rocket build. Still had some finishing touches or at least that is what I thought. My mama loved the fact that I took over her dining room with all my stuff.

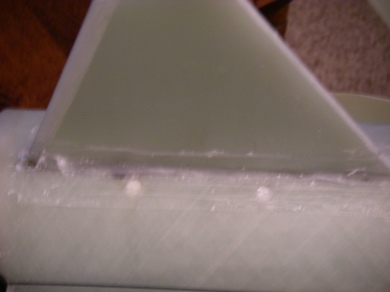
There were quite a few pieces that needed epoxy. The external fillets for the fins were one of the big areas.

The fillets look pretty ugly but hey they look sturdy. Just could not get the epoxy smooth. The transition from the bottled epoxy to the West Systems has been much tougher than expected.

My attempt at installing the motor retainer gave me fits, so I decided to wait until I got home to deal with that. The urge to smash it was too great to risk it.

« Previous entries